May 29, 2008

Jumping on the Chinese Style Pullover Bandwagon

Item #: Kit-89 Habu Chinese Tunic
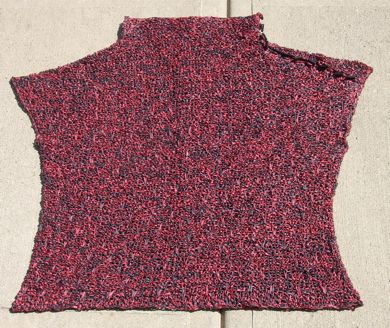
content: 2 strands of A-60 in Red and Charcoal

Negative: This is the first time that I have purchased yarn from Habu and it was full of knots of broken threads. There were so many I didn't want to count.


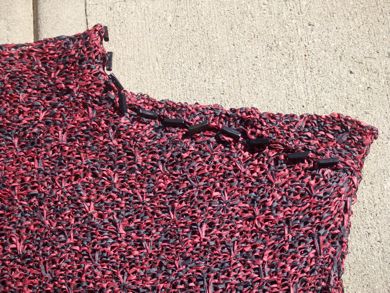
The Estonian Cast on edge really reminds me of the paper loops you make as a kid for a toy necklace. The best thing about it though with three rows of moss stitch it created a flat professional edge.


11 Buttons from Olga with crochets button holes


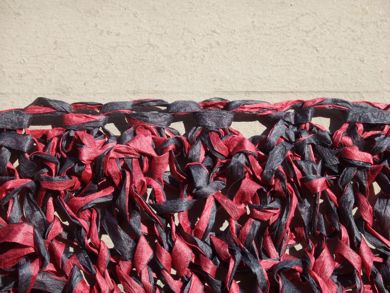
Though the one question that I really had while knitting the pattern is whether a 1 thread raised stitch would have worked better than a slipped stitch with the way that I knit.


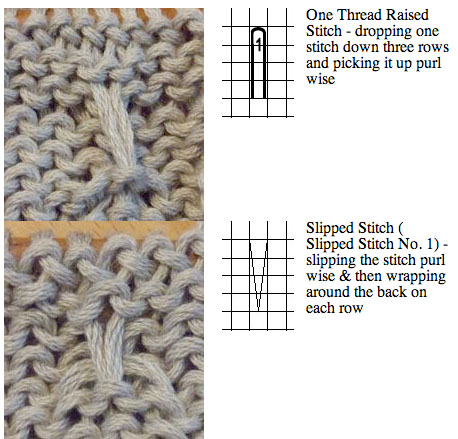
When I first started the sweater I talked with Olga to see if I was missing something with the way that I was doing my stitches. The close up of her stitches , click here appeared more like a honeycomb while mine looked a lot less polished.

May 14, 2008

Chinese Style Pullover


Chinese Style Pullover
Hand-Knit Works by Setsuko Torii
(Kit 89 from habu)
A-60-115 & 117 Shosenshi Paper, 6mm needles
mods: 5 extra Reps to length, single crochet around armholes, modified neck line
5 brown 19 mm buttons (#BO-8-1) from habu

Sculpture. Texture. Knitting.

A garment that bears greater resemblance to a piece of art than a softly folded sweater on the shelf. And yet I love it. I finished this top while traveling and didn't realize until later that the neck line was off - more boat neck than turtleneck. I didn't fix it because after sewing the two pieces together the neck line felt quite comfortable. The V's that make up the stitch pattern accentuate the nature of the yarn, flat linen contrasted by purly bumps. The dark and delicate buttons really complete the pullover. The Japanese numbering system, challenging at first but quickly clear and easy to understand, made for a interesting knit. There were so many things about this project that were new and challenging - a new way to read and execute a pattern, a new yarn (with the cones on a towel rod type tool for smooth knitting), a new construction (I really like the way the arm holes and shoulders are constructed). Surprisingly comfortable when worn, the sound that is created when on the needles doesn't disappear with the bind off. My movements are accompanied by subtle sounds - it's as if I am walking through fields of wheat.

I cast on for this project after seeing Pullovers by Kirsten and Olga - thanks for the inspiration!

More photos at the daily purl.com

May 1, 2008

Japanese Efficiency - Kit-70 New Gauge

Hi Everyone!

Just to let you know, this is my very first time posting on the KAL.

I've visited the group before, but didn't have anything to contribute until now :)

I purchased my Kit-70 last year, but didn't get started on it until this week. It was actually supposed to be a Christmas present for my Aunt in London, but now it will have to be a birthday present instead (I'm kind of a slow knitter and have been sidetracked by other projects).

Once I reviewed the instructions, I found that I really loved the style and efficient 'beauty' of Japanese knitting patterns and the use of numeric 'sequences' to guide the knitter.

Since those numeric sequences were so different than what I'm used to working with, I decided to 'map out' the whole thing in Excel (I love my spreadsheets, plus Kirsten and a few other knitter's kept mentioning the irregularities in this pattern and I was scared to jump right in).

After inputting everything for the sweater's back panel, I zoomed out and noticed how wide it looked...

It was alarming!

Somehow, the shape was horizontally 'skewed', as if it were stretched lengthwise:

Since something was visibly wrong, I double checked the Habu schematic. All the measurements looked good and the illustration was drawn like it was supposed to fit a 'normal' adult human (not an orangutan with really long arms that drag on the ground).

Then, I decided to break out the calculator and dig deeper...

The instructions note that you should get a row gauge of:
18 rows = 4" (4.5 rpi - rows per inch)

On the schematic, they want you to achieve the following measurements WITH that gauge:
162 Rows = 26" (6.24 rpi)
100 Rows = 16" (6.25 rpi)
140 Rows = 22.4" (6.25 rpi)

Does anyone else see a conflict here?

It seems like the only way to get those measurements is to use a row gauge of 6.25 rpi or 25 rows per 4", making the correct gauge for this pattern 25 rows and 16 stitches per 4" square.

Here's what it looks like with the row gauge corrected:

At least now, I feel more confident casting on.

Hopefully, this is the only bug in the pattern?